An overview of what the NIMH Data Archive (NDA) is and how REDCap can be customized for data sharing to the NDA
The research project you’re working on has a data sharing and archiving requirement with the NIMH Data Archive: what does that mean?
This post will answer that question and go over the process of meeting that requirement. Specifically, it will address the best practices for handling your human subjects data in a REDCap project for the purpose of reporting research data to the NIMH Data Archive (NDA). Although the details will focus on the specifics of how the NDA works, what is covered here will also be generalizable to other archiving services.
Please note: this post does not cover reporting genomics or imaging data to the NIMH Data Archive.
Contents:
- Overview
- Data Dictionaries
- An Example: The Research Subject and Demographics Form
- Understanding GUIDs
- Calculating “Age In Months” (AIM)
- Creating Reports for Output to NDA
Overview
Research funded by the National Institute of Mental Health (NIMH) and other NIH institutes increasingly has specific requirements for archiving and sharing the research data collected by funded studies. In the case of NIMH, they have an archiving service specifically dedicated for this purpose: the NIMH Data Archive (https://nda.nih.gov/). It provides both a means to archive the collected data, and a way of disseminating those data to approved researchers and linking the data to published studies.
Studies that use the NDA are required to upload their data semi-annually during the study’s data collection phase. During this phase, the data are not immediately available for dissemination: this ensures both that the data can be reviewed and validated, and that the researchers collecting the data can use and publish the results of the data collection first. After the data go through the validation process and the research team are given a window of opportunity to publish their findings, then the data are made available through the NDA to approved users.
The NDA web site has a lot of information and tutorials to help people understand the process and the web site’s terminology. To summarize, using the NDA follows these basic steps. You can find more detail at https://nda.nih.gov/nda/data-contribution.html.
- The study is added to the NDA and associated with the study’s Primary Investigator (PI) through the NDA Data Submission Agreement (DSA). The PI, as well as other research team members, need to create user accounts on the NDA web site for the purpose of completing the data upload requirement.
- The PI or research team indicate what data they will archive with NDA. These are called the “expected data”. The expected data must take the form of instruments and measures defined in the NDA Data Collection data structures. If a data structure doesn’t already exist in the NDA Data Collection, then there is a process to add new data structures to the Data Collection.
- Study subjects whose data will be reported to the archive are assigned NDA GUIDS (global unique identifiers). All data uploaded to NDA have these GUIDS to identify which study subject the research team collected data about.
- After the start of the data collection phase of the study, the research team needs to report their data every 6 months, in January and July. Data reporting is cumulative, so each time data are reported, all previous data are included in the upload as well. Although this may seem redundant, it is a much easier task to simply report all data collected every time, rather than trying to keep track of what has or has not yet been reported.
- At the end of the data collection phase and after the last 6 month reporting deadline, the PI and research team indicate that they have completed reporting all data and the project goes to “analysis phase”.
Data Dictionaries
Both REDCap and NDA use “data dictionaries”. Understanding what they are and how they should be used can help both with data collection and the NDA data reporting requirements. If you are familiar with either type, hopefully you will quickly see the similarities between the two.
If you are not familiar with the concept of “Data dictionaries”, for both REDCap and NDA, these are documents that list all the fields in a project (in the case of REDCap) or a data structure (in the case of NDA). Both systems use CSV (comma-separated value) text documents that can be read by spreadsheet software such as Excel or Google Sheets. The first line of each file contains the column headers, and all the other lines describe the individual “variables” (for REDCap) or “elements” (for NDA), starting with the variable or element name.
For a research project collecting a variety of measures about the study's subjects, all the data from these clinical measures or surveys, as well as demographics and family contact information, are typically stored in a single REDCap project. You can find all the details in the one REDCap "data dictionary" for the whole project. NDA "data dictionaries", by contrast, represent only a single measure or "data structure". For example, a REDCap project's data dictionary might include an initial enrollment form with contact information, a screening survey with demographics data, and then actual measure data including diagnostic measures and other data points. In the NDA, those data are broken out into separate data structures, each with their own data dictionary files, starting with the basic demographics data (the Research Subject), and then other structures. Examples include measures such as the ADOS2, Mullen Scales, or other standard or novel measures of ability or behavior.
The details of NDA data dictionaries and REDCap data dictionaries are not the same, and there are plenty of differences between the two once you get past the variable/element names. However, NDA data dictionaries are intended to be used by the research team to correctly structure research data for upload to the NDA. They can also be used to help structure a REDCap project to simplify the process of accurately storing and reporting data to NDA, with the least amount of recoding and restructuring.
An Example: The Research Subject and Demographics Form
The one data structure that is almost universal to NDA data sharing reporting, at least in the case of behavioral subjects research, is the Research Subject form (https://nda.nih.gov/data_structure.html?short_name=ndar_subject01). This contains the basic demographic information about the research subject, as shown in the following partial listing of the NDAR Research Subject data dictionary.
| ElementName | DataType | Size | Required | Condition | ElementDescription | ValueRange |
|---|---|---|---|---|---|---|
| subjectkey | GUID | Required | The NDAR Global Unique Identifier (GUID) for research subject | NDAR* | ||
| src_subject_id | String | 20 | Required | Subject ID how it's defined in lab/project | ||
| interview_date | Date | Required | Date on which the interview/genetic test/sampling/imaging/biospecimen was completed. MM/DD/YYYY | |||
| interview_age | Integer | Required | Age in months at the time of the interview/test/sampling/imaging. | 0 :: 1260 | ||
| sex | String | 20 | Required | Sex of subject at birth | M;F; O; NR | |
| race | String | 30 | Required | Race of study subject | American Indian/Alaska Native; Asian; Hawaiian or Pacific Islander; Black or African American; White; More than one race; Unknown or not reported; Other Non-White; Other | |
| ethnic_group | String | 255 | Recommended | Ethnic group | ||
| phenotype | String | 200 | Required | Phenotype/diagnosis for the subject |
The columns to note in this table are:
- ElementName, which will correspond to the “variable” name in REDCap
These are the variable names, labels or column names in your data. You will need to be able to map your data names and labels with the NDA "ElementNames" when you build your files for upload. - Required: these columns must have data in the NDA upload files
Many data elements that are listed as "Required" in the NDA data dictionary will often have a "missing" or "unknown" option. Some values such as data collection dates, on the other hand, are required and it is important that your data include those values for all measures. - DataType: this corresponds somewhat to the REDCap “field type” and is important for data validation
Knowing the required data types in the NDA data dictionaries will be important to know for your data submission. In the example above, "sex" is encoded as a "String", but often in REDCap sex or gender take a "radio" Field Type and are stored as numbers and labeled with string values.If that is the case, you will have to recode your values to match the NDA's expected values. - ValueRange: These are the valid values that can be reported in the NDA data upload. Just as with the DataType, you will need to match your data and possibly recode your values to match what NDA expects.
One important data element to note in this data dictionary example is the "interview_age". This value is an integer, and is the subject's "age in months" at the time of the data collection. Refer to the discussion, below ("Calculating Age In Months"), for more about what this is and how to calculate it.
For comparison, this is the data dictionary of a REDCap project that will be reporting data to NDA:
| Variable / Field Name | Form Name | Section Header | Field Type | Field Label | Choices, Calculations, OR Slider Labels |
|---|---|---|---|---|---|
| record_id | enrollment_and_consent | text | Record ID | ||
| partic_id | enrollment_and_consent | text | Participant ID | ||
| enroll_email | enrollment_and_consent | text | Preferred email | ||
| enroll_consent | enrollment_and_consent | text | Consent received | ||
| ex_consent_name | enrollment_and_consent | text | Name of Examiner receiving Informed Consent | ||
| enroll_status | enrollment_and_consent | radio | Status in study | 1, Enrolling | 2, Active | 3, Not eligible | 4, Withdrawn from study | 5, Inactive | |
| enroll_notes | enrollment_and_consent | notes | Notes | ||
| demog_date | demographics | text | Date completed | ||
| demog_child_fname | demographics | Child Information | text | Child's full name (as it appears on birth certificate) | |
| demog_child_pname | demographics | text | Child's preferred name | ||
| demog_child_dob | demographics | text | Child's date of birth | ||
| demog_child_citybirth | demographics | text | Child's city/municipality of birth | ||
| demog_child_sex | demographics | radio | Child's sex | 0, Male | 1, Female | |
| demog_child_eth | demographics | radio | Child's ethnicity | 0, Not Hispanic/Latino | 1, Hispanic/Latino | 2, Do not wish to provide | |
| demog_child_race | demographics | radio | Child's race | 0, American Indian or Alaskan Native | 1, Asian | 2, Black or African American | 3, Native Hawaiian or Other Pacific Islander | 4, White | 5, More than one race | 6, Unknown or do not wish to report |
In this data dictionary, you can see where variables such as “demog_child_sex”, “demog_child_race” and “demog_child_eth” will correspond with “sex”, “race” and “ethnic_group” in the NDA Subject data dictionary. Setting up the Choices options (i.e., Choices, Calculations, or Slider Labels column) to match the valid values required by NDA can save a step in the upload process, so that these values don’t have to be “converted” or “recoded” for reporting to NDA.
Understanding GUIDs
GUIDs, or global unique IDs (pronounced “GOO-id”), are a required data field or variable of submitted NDA data; and it is important to understand what they are and how to add them to your data. There is plenty of documentation about NDA GUIDs on the NDA web site (https://nda.nih.gov/nda/using-the-nda-guid.html). What follows is a brief summary of what they are and the steps needed to generate them for your data collection.
Just as in your own research data, in the NDA database, each subject needs to have a unique identifier, in this case the GUID. Additionally, the GUID serves a special purpose: to create a unique identifier that can be used to identify subjects who are included in multiple studies. The NDA has developed their GUID system to facilitate this, while keeping the data uploads free of personally identifiable data. They accomplish this by using identifiable data stored on your local system, not transmitted to NDA. The process is similar to the way a password is encrypted: the subjects’ identifiable data are “encrypted” on the research teams’ own machines and then are used to create a unique value. The important point is that the encrypted value cannot be “decrypted”: the process only goes one way. If another research team provides the same data about a subject, the same encryption will occur and the existing GUID will be found and assigned to that individual.
Because of this need to find existing GUIDs already in the data, the NDA process for creating GUIDs requires a specific list of your subjects’ data, which you should try to collect:
- First Name
- Middle Name
- Last Name
- Sex
- Date of Birth
- City/Municipality of Birth
To avoid ambiguity, these values should be reported as they appear on the subjects’ birth certificates, so they do not change over time. If you cannot collect these values, you can instead use the NDA’s “pseudoGUIDs”.
It’s important that you are aware of the need to collect these specific details from your study’s subjects before you even start recruiting. You need to have these fields in your data collection instruments, such as the Demographics or Intake form of your study. And you need to include these data in REDCap, so you can access them when you are ready to report the data to NDA. Once you use these values to generate each subjects’ GUID, you will also need to store the GUID in REDCap as well.
Here is a partial example of a REDCap data dictionary set of variables, illustrating how this might look.
| Variable / Field Name | Form Name | Section Header | Field Type | Field Label | Choices, Calculations, OR Slider Labels |
|---|---|---|---|---|---|
| nda_first_name | nda_guids | text | Child's first name as it appears on birth certificate | ||
| nda_middle_name | nda_guids | text | Child's first name as it appears on birth certificate | ||
| nda_last_name | nda_guids | text | Child's first name as it appears on birth certificate | ||
| nda_sex | nda_guids | radio | Child's sex listed on birth certificate | M, Male | F, Female | O, Other | NR, Not reported | |
| nda_date_of_birth | nda_guids | text | Child's date of birth on birth certificate | ||
| nda_birth_city | nda_guids | radio | Child's city/municipality of birth listed on birth certificate | ||
| nda_guid | nda_guids | radio | NDA GUID assigned | ||
| nda_guid_date | nda_guids | text | Date GUID assigned to subject |
Calculating “Age In Months” (AIM)
Each of the NDA data structures require two values related to when the data were collected. One is the date on which the data were collected. The second value needs to be related to the subject’s age on that date. Instead of requesting the subject’s date of birth, the NDA expects an integer value representing the age of the subject at the time of data collection, represented in the number of months, rounded to the nearest month, since their birth. The specific wording describing the value in the NDA Data Dictionary is, "Age is rounded to chronological month. If the research participant is 15-days-old at time of interview, the appropriate value would be 0 months. If the participant is 16-days-old, the value would be 1 month.". This is what is meant by “age in months” or AIM. These values need to be calculated for every measure you collect on your subjects.
This value can be calculated directly in REDCap using the “calc” data type, two “special functions” and two date variables. The special functions are “round”, to round the calculated number of months to the nearest integer, and “datediff”, to calculate the date difference in months. The two variables are the date of data collection and the subject’s date of birth. If the two variables are “nda_date_of_birth” (for the date of birth) and “measure_date”, then the calculation will be:
round(datediff([nda_date_of_birth], [measure_date], 'M'))
The “datediff” function takes 3 values: the two dates, and then a code representing the time unit in which to calculate the difference. In this case, the “M” means months. Note that capitalization is important: “M” is not the same as “m”! The “datediff” function is inside the “round” function, to modify the output of “datediff” to the nearest integer.
This is what it looks like in the REDCap field dialog box:
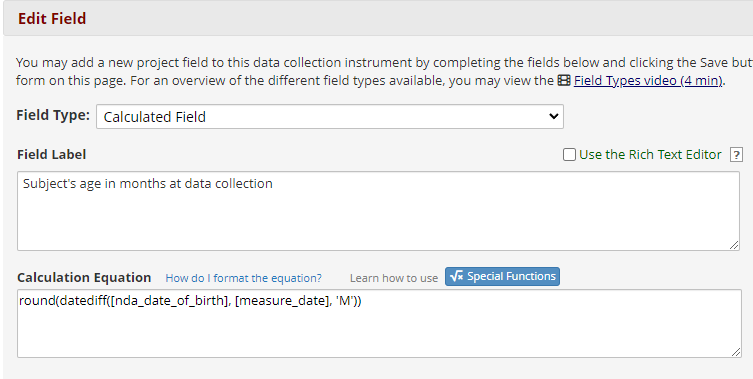
Remember: if you add this calculation or modify this calculated field after you already have data in your project, you can update all your calculated fields by going to the project’s Data Quality tool and running Rule H: “Incorrect values for calculated fields”.
You don’t have to use this type of field to calculate AIM. You can do this calculation externally to REDCap, using Excel or statistical software such as SPSS or even with a scripted language such as Python. This is just one option.
Creating Reports for Output to NDA
To upload your data to NDA, you will need to create reports or extracts from REDCap. There is no way to create a report using the REDCap default functionality that exactly matches the template structure expected by the NDA. Additionally, because the NDA expects separate files for each data structure or measure, you will likely want to create separate reports for each. Depending on how your data are structured and encoded in REDCap, you may also need to do some manipulation of the output files to prepare them for upload. The following is intended to explain those differences and what you need to do to prepare your data files.
NDA uploads consist of separate files, one for each “data structure”. In addition to the data dictionary, each data structure also has a template file. Template files are comma-separated text files, with two header rows. The first row or line of the files is the “data structure” name and version. The second row is a comma-separated list of all the expected data columns. These column headers correspond to the definitions in the data dictionary, and the uploaded data are expected to match those definitions.
To report data out of REDCap for upload to NDA, these are the basic steps:
- Create REDCap reports based on the NDA data dictionary for each instrument or data structure you need to upload to NDA
- Extract the data as CSV files
- Modify the data as needed to match the NDA data dictionary for each file. For example, you may need to recode some values in your data to match the expected values in the NDA data dictionary, or you may need to fill fields marked in the NDA data dictionary as “required” with a suitable “missing value” if the value is not in your data.
- Apply the header rows of the NDA data structure template to your data file
- Stage your files in a folder on your computer for upload
- Go to the NDA Data Validation and Upload Tool (https://nda.nih.gov/vt/) to upload your data
In practice, executing this list of tasks the first time you have to report your data will likely be somewhat daunting. However, once the process is set up, subsequent uploads should be easier, as several of the steps only need to be completed once.
Lisa Hallberg is a research engineer with the Life Span Institute's Research Design and Analysis team.